Mastering Your Camera's Many Exposure Modes
Posted: June 12, 2012
Some people know their camera's exposure modes, and how to utilize them, like the back of their hand – others not so much. Here is a rundown of the most common modes, and pointers on how to use them to take great photos.
Some people know their camera's exposure modes, and how to utilize them, like the back of their hand – others not so much. Here is a rundown of the most common modes, and pointers on how to use them to take great photos.
I have friends who seek out my advice when buying a new camera. They want to know which ones "take the best photos." But after they get their new camera, they never take it out of Auto mode, and are ultimately disappointed with the results. In reality, cameras don't take great photos--but they come with controls that allow people to do so. Unfortunately, it isn't always obvious how to use those settings. In recent weeks, I've explained how to use shutter speed to take action photos and how to dial in great depth of field with the aperture. This week, let's look at the most common exposure modes in popular cameras and talk about why you would use each one.
Auto
![]()
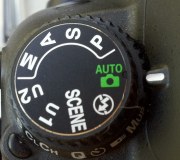
 I probably don't need to say a lot about your camera's Auto mode. If you're new to photography, or just a snapshooter who doesn't want to spend a lot of time thinking about options, then you probably leave your camera in this mode most of the time--after all, this setting is great for snapshots. In Auto, your camera chooses the shutter speed and aperture, and it probably automatically increases the ISO in low-light situations. This mode is easy to find--look for "Auto" or a green icon of a camera.
Program
Program mode--almost always identified with a P--is a big step up in flexibility. In Program mode, your camera still chooses the shutter speed and aperture automatically, but you usually have the ability to control the ISO yourself, which lets you choose when to optimize for higher shutter speeds and when to reduce the digital noise that comes with high ISOs. You can also make small adjustments to the shutter speed and aperture without leaving the comfort of a mode that's "mostly automatic." For more details on this mode, check out "Master the Hidden Power of Your Camera's Program Mode."
Aperture Priority and Shutter Priority
![]()
 If you're enthusiastic about improving your photography and taking more creative photos, these are the modes that I recommend you spend most of your time exploring. They let you experiment with exposure settings without going all the way to Manual mode.
Aperture Priority (indicated by an A or, on Canon cameras, Av) varies the shutter speed automatically as you set the aperture. Shutter Priority (S or, on Canon cameras, Tv) changes the aperture when you set the shutter speed.
Interestingly, you can see that both of these modes do almost exactly the same thing, so you can choose the one you like best and never mess with the other one. Or you can switch between them depending upon the kind of shooting you're doing. You might want to go with Shutter Priority when shutter speed is critical, such as when shooting action photos (see "Choosing the Right Shutter Speed") and Aperture Priority when you want to control for the depth of field (see "Use the Aperture to Control the Background in a Photo").
Either way, these modes let you vary the shutter speed and aperture without worrying about accidentally under- or overexposing your photo.
Manual
For the ultimate in control, switch to the big M. Manual exposure mode isn't terribly complicated, really--it simply lets you set both shutter speed and aperture independently. Why would you want to do this? Well, you generally don't. The priority modes are what you want at least 90 percent of the time. Despite what you might think, many pros don't even shoot in Manual mode a lot of the time. But Manual mode really shines in what engineers call the "edge cases"--rare situations in which the camera's exposure meter would tend to get the settings completely wrong. Take nighttime, for example. If you're trying to capture city lights at dusk, ignore the camera's exposure recommendations. Instead, switch to Manual and start experimenting with very slow shutter speeds.
Scene Modes
![]()
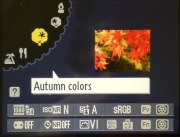
 Finally, many cameras--especially point-and-shoot models, as well as some entry-level digital SLRs--come equipped with anywhere from a handful to dozens of "scene" modes. Dial in the appropriate scene and it'll set the camera's shutter speed and aperture for your specific photographic situation.
Some scene modes do more than that; they might change the flash setting, ISO, and activate other special effects. Check your camera's user guide for details. There are a lot of scene modes to choose from, and many do very specific things. For example, Portrait mode sets the aperture to minimize depth of field, while Night mode might kick in a very long shutter speed. Sand and Snow automatically overexposes the photo to prevent the sand or snow from causing your subject from getting underexposed.
Biz Tip Provided by PCWorld
Written By Dave Johnson