[caption id="attachment_10188" align="alignleft" width="180"] Photo courtesy Flickr user Mariano Kamp.[/caption]
![]() Summer is upon us, and that means we'll be spending a lot more time outdoors, capturing photos of stuff--kids, friends, cars, planes, dogs--in action. Perhaps you've applied some of the ideas in "Digital Photography Tips: Capture Summer Action," and discovered that some of your action photos lacked the excitement you saw in the viewfinder.
Summer is upon us, and that means we'll be spending a lot more time outdoors, capturing photos of stuff--kids, friends, cars, planes, dogs--in action. Perhaps you've applied some of the ideas in "Digital Photography Tips: Capture Summer Action," and discovered that some of your action photos lacked the excitement you saw in the viewfinder.
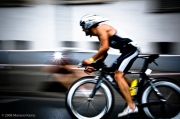
[caption id="attachment_10188" align="alignleft" width="180"] Photo courtesy Flickr user Mariano Kamp.[/caption]
![]() Summer is upon us, and that means we'll be spending a lot more time outdoors, capturing photos of stuff--kids, friends, cars, planes, dogs--in action. Perhaps you've applied some of the ideas in "Digital Photography Tips: Capture Summer Action," and discovered that some of your action photos lacked the excitement you saw in the viewfinder. That's the problem with freezing the action. Sometimes, it's just too frozen. The antidote? A classic photo technique known as panning. This week, let's review five things you need to know to pan the action to get some exciting, vibrant action photos.
Summer is upon us, and that means we'll be spending a lot more time outdoors, capturing photos of stuff--kids, friends, cars, planes, dogs--in action. Perhaps you've applied some of the ideas in "Digital Photography Tips: Capture Summer Action," and discovered that some of your action photos lacked the excitement you saw in the viewfinder. That's the problem with freezing the action. Sometimes, it's just too frozen. The antidote? A classic photo technique known as panning. This week, let's review five things you need to know to pan the action to get some exciting, vibrant action photos.
Before we begin, what is panning? In a nutshell, it's a technique that lets you convey a strong sense of motion in your photo by freezing a fast-moving subject, but allowing the background to blur. When done well, panning shots virtually scream action and excitement. Here's what you need to know to take your own.
1. Review Your Stance
When you pan for the action, you need to track the moving subject in your camera's viewfinder as accurately as possible, keeping it in the same relative position in the scene as it moves. You don't want to be moving when you do this; simply pivot at the hips. That means you should space your legs so you're steady and well-balanced. Hold the camera right up to your eye. Don't try to do this with the camera dangling out in space a foot in front of you, or with the camera down at your hips. I've seen people try both of these positions, and trust me--they don't work very well.
Also, I recommend that you hand-hold the camera rather than mounting it on a tripod. You might think you can put the camera on a tripod and keep the head loose so you can spin the camera to track the action, but in reality this is really hard to do, and you won't track the action as smoothly and consistently as if you just hold the camera and pivot with your body.
2. Adjust the Exposure
[caption id="attachment_10191" align="alignright" width="180"]![]()
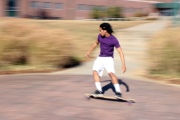
 Photo courtesy Flickr user Lisa H.[/caption]Now it's time to set the camera's exposure. The best pans happen when the shutter speed is just slow enough to blur the background, but not so slow that it's impossible to freeze the subject. Remember that you'll need to snap the photo as the subject passes in front of you and continue to turn your body to track the subject's motion though the exposure. Many digital cameras--especially SLRs--will black out the viewfinder during the exposure, so you can't see anything during the critical moment.
Given those constraints, I recommend setting your camera to Shutter Priority and dialing in a shutter speed of about 1/15 second. Practice with that speed for a while, and if you can get consistently good shots, try slowing the shutter speed to about 1/8 second. If you go much slower than that, you'll have trouble freezing the subject. Faster than 1/15, and the background might not blur enough to look right.
3. Zoom Out
[caption id="attachment_10193" align="alignleft" width="180"] Photo courtesy Flickr user awscherb.[/caption]
![]() Don't zoom in too tightly on the subject. If you're too close, two things happen. First, any shakiness will become really obvious and the subject won't look sharp. Second, if you're too close, you won't be able to see enough of the blurry background to set the context of the shot.
Don't zoom in too tightly on the subject. If you're too close, two things happen. First, any shakiness will become really obvious and the subject won't look sharp. Second, if you're too close, you won't be able to see enough of the blurry background to set the context of the shot.
4. Practice Your Follow-Through
[caption id="attachment_10195" align="alignright" width="180"]![]()
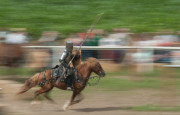
 I panned with the horse to capture this action shot.[/caption]I panned with the horse to capture this action shot.Now it's time to take the shot. As I've mentioned, you want to follow the subject as it passes in front of you, so start tracking it through the viewfinder when it's well off to one side. Pivot your body as it approaches, and gently press the shutter release as it makes its closest approach. Don't "stab" the shutter--press and hold it to minimize any jiggling. And all the while, keep pivoting your body even if you can no longer see though the viewfinder, keeping the same pace you had before. Think of this like the follow-through common in any sport in which you hit a ball with some sort of club or racquet--tennis, golf, baseball. Whichever sport works for you.
After you take the shot, check the LCD to see how you did. Try to hone your technique until the subject is razor sharp and the background is a breakneck blur.
5. Try Some Selective Sharpening
Finally, some post-processing never hurts. You might want to apply a little sharpening or clarity to the subject, but sharpening the whole photo will add ugly artifacts to the blurry background. So compromise: Use a selection tool like a magnetic lasso (in Adobe Photoshop Elements, that's in the sixth cubby from the top of the toolbar), and isolate just the subject. Lightly sharpen it by choosing Enhance, Unsharp Mask in the menu.
 Biz Tip Provided by PCWorld
Written By Dave Johnson